How To Remove Shortcut Virus Without Any Antivirus ?

What is Shortcut Virus?


Shortcut virus is a virus which Enters in to your Pen drive, PC, Hard Disk, Memory cards or mobile phone and change your files into shortcuts with the original folder icons.
Computer Virus infection is only removed through antivirus programs as you know, but this time we are talking about Shortcut Virus, a new modern virus automatically comes in your computer/USB/SD card and convert all of your content into a shortcut. Some time this virus makes you content invisible (not showing) and storage showing still full.
People who don’t know how to remove this virus, they just perform a format over infected storage. If you’re helpless to format your storage, so please don’t do this again, because it is not a genuine solution. If your storage didn’t contain files or anything important, then you should format your storage because formatting also a another method to flush out shortcut virus
The cause of this virus is an internet, third party software, USB storage and more. Sometime when you connect a pen drive to your friend’s computer for exchanging data, but you didn’t know your friend’s computer is already infected by a shortcut virus. As you connect the pen drive back to your computer, the virus becomes the part of your computer.

There are a Easy methods available to remove this virus, using CMD

PROCESS-using CMD (command prompt)

  1. Connect your infected USB storage (Pen drive, SD card, etc.) with your Computer
  2. run command prompt as Administrator.(go to the START BUTTON search "CMD" .right click on cmd and run "as administrator".
  3. Type the following command in Command prompt:  attrib -h -r -s /s /d X:\*.*, (Where, X is the USB drive letter) and press Enter.
know what is (attrib -h -r -s /s /d X:\*.*)
 attrib-displays attributes of all files in the current directory.
-h Clears the hidden file attribute.
-r Clears the read-only file attribute.
-s Clears the system file attribute
/s   Applies attrib and any command-line options to matching files in the current directory and all of its sub-directories.
/d   Applies attrib and any command-line options to directories.

 4-Copy all data from USB flash drive to your computer.
5-Format the USB drive.
6-And, copy all data back to the USB flash drive.

                                         
      NOTICE-
if your computer is infected by this vbscript virus this trick won't work for long and as you reinsert a flash drive you will again see you files vanishing and a mysterious shortcut being created in their place.
One way to stop it from running is to kill the wscript.exe process from task manager . But the virus will execute the next time during startup of your windows solution is to delete the the virus from its hiding place  one obvious hiding place for the virus could be the startup folder-
C:\Users\admin\AppData\Roaming\Microsoft\Windows\Start Menu\Programs\Startup\
<admin> can differ based on what your user name is on your computer 
find and delete 2.vbs from this folder 

Thanks to-vintaytime.com and www.quora.com

Wipe Free Disk Space By One Command Cipher.exe (/w)

Cipher.exe (/w) command line tool

Whenever you create text files and encrypt them till such a time that the encryption process is completed, Windows will create a backup of the file, so that in case anything was to go wrong during the encryption process, the data would still be recoverable using this file. Once the encryption process is completed, the backup is deleted. But then again, this delete backup file can be recovered using data recovery software, until it is overwritten by other data.
Cipher.exe thus allows you to not only encrypt and decrypt data, but also to securely delete data. Thus, many use it todelete files permanently too.

PROCESS-

  1. OPEN COMMAND PROMPT 
  2. TYPE      Cipher /w:X   where X is the letter of the drive or partition you want to wipe.

Be patient—the process can take a long time if you have a lot of free space.

Activate God Mode (100 Of Settings from all around the operating system all in one place)

God Mode

It may be hyperbolic ally named, but Windows 7's God Mode is indeed omnipresent. It conveniently puts hundreds of settings from all around the operating system all in one place.
GodMode is not a plugin, or a software. To activate a GodMode shortcut, you just need to create a simple folder and rename it to a specific filename with a code.
PROCESS-
  1. Create a new folder anywhere on your desktop. Right click on your Desktop and create new folder.
  2. Once created, rename the folder from ‘New Folder’ to this exact code;
        GodMode.{ED7BA470-8E54-465E-825C-99712043E01C}

The folder icon will change to resemble a control panel.
Inside this folder, you will see a whole bunch of control options.
GodMode has made it easy to access all options in one window.
GodMode is a trick that works on Windows Vista, 7,8,10.
THANKS TO-http://www.hongkiat.com


how toTurn on 2-Step Verification in Gmail and Facebook?

TURN ON GMAIL 2-STEP VERIFICATION -


When you enable 2-Step Verification (also known as two-factor authentication), you add an extra layer of security to your account. You sign in with something you know (your password) and something you have (a code sent to your phone).

Set up 2-Step Verification-

  1. Go to the 2-Step Verification page. You might have to sign in to your Google Account.
  2. In the "2-Step Verification" box on the right, select Start setup.
  3. Follow the step-by-step setup process.
Once you're finished, you'll be taken to the 2-Step Verification settings page. Review your settings and add backup phone numbers. The next time you sign in, you'll receive a text message with a verification code. You also have the option of using a Security Key for 2-Step Verification.
Note: To ensure that you can access your account in the future, add an email recovery option as well.

TURN ON LOGIN APPROVALS IN FACEBOOK-

Login approvals are a security feature similar to login alerts, but with an extra security step. If you turn on login approvals, you'll be asked to enter a special security code each time you try to access your Facebook account from a new computer, mobile phone or browser.
To turn on login approvals:
  • Go to your Security Settings
  • Click on the Login Approvals section
  • Check the box and click Save Changes
After you turn on login approvals:
  • If you haven't saved the device (ex: computer) or browser you're using, you'll be asked to do so when you turn on login approvals. This way you won't have to enter a code when you log in from any of your recognized devices or browsers. Don't click Save this browser if you're using a public computer (ex: a library computer).
  • We need to be able to remember your computer and browser information so we can recognize it next time you log in. Some browser features block this. If you've turned on private browsing or set up your browser to clear your history every time it closes, you might have to enter a code every time you log in. 
Note: You need to have a mobile phone number listed on your account to turn on login approvals. You can add one to your account when you turn on login approvals.
thanks.

CREATE BOOTABLE USB DRIVE OF WINDOWS(OS) & LINUX (OS) BY Rufus Software


Rufus is a utility that helps format and create bootable USB flash drives, such as USB keys/pendrives, memory sticks, etc.


It can be especially useful for cases where:
  • you need to create USB installation media from bootable ISOs (Windows, Linux, UEFI, etc.)
  • you need to work on a system that doesn't have an OS installed
  • you need to flash a BIOS or other firmware from DOS
  • you want to run a low-level utility.

System Requirements:

Windows XP or later, 32 or 64 bit doesn't matter. Once downloaded, the application is ready to use.

TOOLS-
  • USB PENDRIVE MORE THAN 4GB
  • ISO IMAGE FILE OF OS.
PROCESS -
  1. Download the executable and run it – no installation is necessary.
  2. Select your usb device.
  3. Select partition scheme (according to your system)
  4. Select file system (FAT32 OR NTFS)
  5. Select your iso image .(os image file)
  6. Click on start.
  7. Your pendrive ready to boot.

Install Ubuntu 16.04 LTS

1-Using a DVD?
It’s easy to install Ubuntu from a DVD. Here’s what you need to do:
Put the Ubuntu DVD into the DVD-drive
Restart your computer. You should see a welcome screen prompting you to choose your language and giving you the option to install Ubuntu or try it from the DVD.
If you don’t get this menu, read the booting from the DVD guide for more information.

Using a USB drive?

Most newer computers can boot from USB. You should see a welcome screen prompting you to choose your language and giving you the option to install Ubuntu or try it from the USB.
If your computer doesn’t automatically do so, you might need to press the F12 key to bring up the boot menu, but be careful not to hold it down - that can cause an error message.
2-Prepare to install Ubuntu
  • We recommend you plug your computer into a power source
  • You should also make sure you have enough space on your computer to install Ubuntu
  • We advise you to select Download updates while installing and Install this third-party software now
  • You should also stay connected to the internet so you can get the latest updates while you install Ubuntu
  • If you are not connected to the internet, you will be asked to select a wireless network, if available. We advise you to connect during the installation so we can ensure your machine is up to date.


3-Allocate drive space

Use the checkboxes to choose whether you’d like to Install Ubuntu alongside another operating system, delete your existing operating system and replace it with Ubuntu, or — if you’re an advanced user — choose the ’Something else’option
4-Begin the installation
Depending on your previous selections, you can now verify that you have chosen the way in which you would like to install Ubuntu. The installation process will begin when you click the Install Now button.
Ubuntu needs about 4.5 GB to install, so add a few extra GB to allow for your files.
5-Select your location
If you are connected to the internet, this should be done automatically. Check your location is correct and click ’Forward’ to proceed. If you’re unsure of your time zone, type the name of the town you’re in or click on the map and we’ll help you find it.
6-Select your preferred keyboard layout
Click on the language option you need. If you’re not sure, click the ’Detect Keyboard Layout’ button for help.

7-Enter your login and password details

8-Learn more about Ubuntu while the system installs…
9-That’s it.
All that’s left is to restart your computer and start enjoying Ubuntu!

THANKS TO-http://www.ubuntu.com

How to change Windows 7 "Send To" Menu?

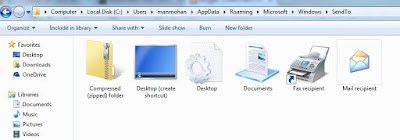
These are the default items that you should see on the Send To menu when you right-click on a file:
process-

1-Hold down the Shift key while right-clicking on the icon, and then try the Send To menu… all sorts of extra options-
2-If you want any of those to show up normally without holding down the Shift key, you can create shortcuts in the Send To folder. Just type the following into the location bar:
C:\Users\user name\AppData\Roaming\Microsoft\Windows\SendTo (edit "user name" as your pc user name.
or
shell:sendto

after this default send to item show...


3-And then drag or copy-past shortcuts to your preferred folders and drive into this folder.
4-after this step try this....right click on any folder and go to send to ...you your drive or folder ...which you added..

How to Invite All Friends To Like Facebook Page ?

Today we are going to explain you the best way to invite all friends to like page on Facebook. This will help you to give tremendous growth to Facebook page likes and save time.

PROCESS-
1-FIRST OF ALL INSTALL GOOGLE CHROME EXTENSION(Invite all friends on Facebook)  IN CHROME BROWSER .
2-THIS EXTENSION WILL PROVIDE THE FEATURE TO INVITE ALL FACEBOOK FRIENDS BY ONE CLICK.
 3-AFTER THE INSTALLING OF THIS CHROME EXTENSION SMALL ICON WILL START APPEARING ON THE TOP RIGHT SIDE OF THE BROWSER.


4-WHEN YOU OPEN FACEBOOK THIS ICON APPEAR OTHERWISE IT WILL DISAPPEAR.
5-NOW LOGIN YOUR FACEBOOK ACCOUNT .
6-OPEN YOUR PAGE.
8-CLICK ON "INVITE ALL FRIEND" BUTTON .
9-POP UP OF INVITE ALL FRIEND APPEAR.
10-NOW CLICK ON EXTENSION ICON.
11-YOUR ALL FRIEND INVITED.
          ENJOY  

               FOR MORE-  CLICK HERE

HOW TO CREATE PASSWORD RESET DISK?


Sometime you face a problem of forgotten password in your Windows PC. If yes better have a backup plan now itself. Here we are going to tell you, how you can reset Windows password using a reset password disk.

Requirements:
A USB Flash Drive(Any size)
Important: Once a password reset disk has been created, no matter how many times the password has been changed after that, you can reset the password using the Disk any number of times. In order to avoid misuse of the device, keep it in a safe place.
PROCESS-
1-FIRST INSERT A "USB FLASH DRIVE".
2-OPEN "CONTROL PANEL".
3-GO TO "USER ACCOUNTS" OPTION.
4-IN THE LEFT PANE OF "USER ACCOUNTS",CLICK ON "CREATE A PASSWORD RESET DISK".

5-AFTER OPEN THIS WINDOW CLICK ON "NEXT".


6-AFTER CLICK NEXT "SELECT YOUR FLASH DRIVE'.

7-AFTER SELECTION CLICK "NEXT".

8-IF YOU SET A PASSWORD IN YOUR ACCOUNT "INTER IT".


9-AFTER 100% PROCESS YOUR PASSWORD RESET FILE SAVE IN USB FLASH DRIVE.

You can backup your user identity in a USB disk and use the disk for resetting your Windows user password in the future in case you have forgotten it.
Store reset file safely. 

HOW TO USE WINDOW EASY TRANSFER ?


Windows Easy Transfer was a specialized file transfer program developed by Microsoft which allows users of the Windows operating system to transfer personal files and settings from a computer running an earlier version of Windows to a computer running a newer version.
Windows Easy Transfer was introduced in Windows Vista and is included in the Windows 7, Windows 8, and Windows 8.1operating systems. It replaces the Files and Settings Transfer Wizard included with Windows XP and offers limited migration services for computers running Windows 2000 Service Pack 4 and Windows XP Service Pack 2. It does not transfer applications, only files and most settings.The Windows Easy Transfer program was discontinued in Windows 10.

Items transferred

For all supported versions of Windows, Easy Transfer can transfer-
  • Data files and folders
For transferring from Windows versions later than Windows 2000:
  • User accounts and their settings
  • Windows and application configuration data stored in files or in the Windows Registry
As of Windows 8.1, Easy Transfer can no longer export data to another computer, but can still open files created on an earlier version of Windows.
Windows Easy Transfer does not support transferring installed applications.For transferring certain supported applications from Windows XP to Windows Vista, Microsoft had planned to release a supplementary Windows Easy Transfer Companion application, but the application remained as a perpetual beta during development and a final version was never released
_________________________________________________________________________________

Restrictions-

Windows Easy Transfer does not support migration from a 64-bit to a 32-bit system.
_________________________________________________________________________________
PROCESS-
1-GO TO YOUR OLD PC (WHICH COMPUTER SETTINGS YOU WANT TO TRANSFER.)
2-SEARCH IN WINDOW.(TYPE WINDOW EASY TRANSFER ).
3-OPEN WINDOW EASY TRANSFER .

4-CLICK ON "NEXT".


5-FOR TRANSFER YOU HAVE THREE CHOISE.
A- AN EASY TRANSFER CABLE
B-A NETWORK
C-AN EXTERNAL HARD DISK OR FLASH DRIVE

6-USE "AN EXTERNAL HARD DISK OR FLASH DRIVE" OPTION FOR EASY.

7-SELECT "THIS IS MY OLD COMPUTER".


8-AFTER SELECTION "WINDOW EASY TRANSFER SCANNING YOU PC SETTING & FILE FOR TRANSFER .


9-AFTER SCANNING YOU CUSTOMIZE YOUR SETTING AND FILE FOR TRANSFER.
10- CLICK ON NEXT.


11-SET A PASSWORD FOR "SECURITY" .
12-AFTER SET PASSWORD CLICK ON SAVE.
13-SAVE TRANSFER FILE IN YOUR LOCATION DRIVE.
14-AFTER SAVING 'A FILE GENERATE IN YOUR  AN EXTERNAL HARD DISK OR FLASH DRIVE'.


15-AFTER THIS PROCESS .GO TO YOUR NEW COMPUTER .OPEN TRANSFER FILE.
16-INTER YOUR PASSWORD .
17-AND TRANSFER YOUR FILE YOU NEW COMPUTER.

HOW TO CREATE THEME PACK?

Creating a basic theme is easy – you just customise your desktop the way you want it, then click “Save theme” on the Personalization page in the Control Panel. Just make sure to choose the “theme pack” type in the drop-down list when doing so. That's really all there is to it.
_________________________________________________________________________
PROCESS-
1- CREATE A FOLDER .
2-PUT YOUR PIC OR WALLPAPER IN FOLDER.
3-SET A FOLDER  PIC AS PC WALLPAPER.
4-GO TO DESKTOP AND OPEN "Personalize".
5-CLICK ON "desktop background".
6-SELECT ALL PIC AND SAVE.
7-GO TO THE "Unsaved Theme".     
                                                                                      

8-RIGHT CLICK ON "UNSAVED THEME".
9-CLICK ON "save theme for sharing".
10.GIVE A NAME AND SAVE.