
EXPAND YOUR RAM IN WINDOWs SYSTEM !!!
If your computer lacks the random
access memory (RAM) needed to run a program or operation, Windows uses virtual
memory to compensate.Virtual memory combines your computer’s RAM with temporary space
on your hard
disk. When RAM runs low, virtual memory moves data from RAM to a space
called a paging
file. Moving data to and from the paging file frees up RAM so your computer
can complete its work.
The more RAM your computer has, the faster your programs will generally run. If a lack of RAM is slowing your computer, you might be tempted to increase virtual memory to compensate. However, your computer can read data from RAM much more quickly than from a hard disk, so adding RAM is a better solution.
The more RAM your computer has, the faster your programs will generally run. If a lack of RAM is slowing your computer, you might be tempted to increase virtual memory to compensate. However, your computer can read data from RAM much more quickly than from a hard disk, so adding RAM is a better solution.
Change the size of virtual memory-
PROCESS-
- Right click on "COMPUTER" icon and select "properties".

- In the left pane, click Advanced system settings. If you are prompted for an administrator password or confirmation, type the password or provide confirmation.

- On the Advanced tab, under Performance, click Settings.

- Click the Advanced tab, and then, under Virtual memory, click Change.

- Clear the Automatically manage paging file size for all drives check box.
- Under Drive [Volume Label], click the drive that contains the paging file you want to change.
- Click Custom size, type a new size in megabytes in the Initial size (MB) or Maximum size (MB) box, click Set, and then click OK.


-
Increases in size usually don't require a restart for the changes to take effect, but if you decrease the size, you'll need to restart your computer. We recommend that you don't disable or delete the paging file.
-
Simplification Of K-Map (Karnaugh Map)
The logic simplification examples that we have done so could have been performed with Boolean algebra about as quickly. Real world logic simplification problems call for larger Karnaugh maps so that we may do serious work. We will work some contrived examples in this section, leaving most of the real world applications for the Combinatorial Logic chapter. By contrived, we mean examples which illustrate techniques. This approach will develop the tools we need to transition to the more complex applications in the Combinatorial Logic chapter.
We show our previously developed Karnaugh map. We will use the form on the right.
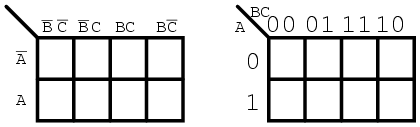
Note the sequence of numbers across the top of the map. It is not in binary sequence which would be 00, 01, 10, 11. It is 00, 01, 11 10, which is Gray code sequence. Gray code sequence only changes one binary bit as we go from one number to the next in the sequence, unlike binary. That means that adjacent cells will only vary by one bit, or Boolean variable. This is what we need to organize the outputs of a logic function so that we may view commonality. Moreover, the column and row headings must be in Gray code order, or the map will not work as a Karnaugh map. Cells sharing common Boolean variables would no longer be adjacent, nor show visual patterns. Adjacent cells vary by only one bit because a Gray code sequence varies by only one bit.
If we sketch our own Karnaugh maps, we need to generate Gray code for any size map that we may use. This is how we generate Gray code of any size.
*Important:
Notice that this edge numbering does not follow the normal binary counting sequence, but uses a Gray Code sequence where only one bit changes from one cell to the next. This is an important feature of Karnaugh maps; get the sequence wrong and the map will not work.
For more information about k-map watch this video-
credit goes to-http://www.allaboutcircuits.com and raj kumar for video
REPAIR YOUR CORRUPTED USB DISK DRIVE !
If your USB flash drive, SD card, or another drive isn’t working quite right, “cleaning or repair” the drive and removing its partitions is one possible solution. This can fix problems with a drive that can’t be formatted or one that shows the wrong capacity.
FOR THIS, WE ARE USING DISKPART TOOL IN COMMAND LINE-
ERRORS-


FOR THIS, WE ARE USING DISKPART TOOL IN COMMAND LINE-
ERRORS-
- Computer cannot recognize a USB drive.
- USB drive partition has been corrupted.
- Format command dose not work.
- Resetting and wiping out all exist data to become a blank USB drive.
- Make a bootable USB drive.
- Simply reset and reformat a USB drive.
PROCESS STEP BY STEP-
1-Launch a Command Prompt as Administrator

2-TYPE DISKPART IN CMD

3-NOW TYPE LIST DISK

4-ALL YOUR DISK DRIVE SHOW IN THE LIST
NOW TYPE SLECT DISK 1 YOU CHANGE YOUR DISK BY CHANGING DISK NO
The diskpart command has now selected the disk you specified. Any actions you perform will now be performed on the selected disk.
NOTE-PLEASE SELECT YOU DISK CAREFULLY

5. Type clean

6. Type create partition
primary

7. Type format fs= fat32
quick
or format fs=ntfs
quick

8-A. Type active
B. Type assign
C. Type exit

If this method didn’t work it’s possible the drive is simply physically damaged and is no longer working properly. But “cleaning” the drive with diskpart is a solution that can bring drives that would seem broken to most people back to life.
HOW TO MAKE GIFS ON GIPHY ?
Making GIFs is easy! Follow this guide to using giphy.com-
Use Upload to put your GIF collection on Giphy so that you can share your GIFs on Facebook, Twitter, Instagram, text message, email, and everywhere else
Step 1 – Add Files
Choose GIF files to add by dragging and dropping, clicking the blue search button to browse your files, or entering GIF URLs to add files for upload. You must be logged in to upload multiple GIFs so we can save them to your channel page.
TIP: If you add GIFs via URL make sure your URL is an image URL ending in .gif and not just any website URL (example GIF URL: http://i.giphy.com/l0O9xQNSsQKmfSeUU.gif)
Step 2 – Reorder GIFs
Optional: You can change the order GIFs will appear on your channel page by dragging and dropping the files or clicking "Reverse Order."
Optional: You can change the order GIFs will appear on your channel page by dragging and dropping the files or clicking "Reverse Order."
Step 3 – Add Tags, Source URL, and Privacy settings
Optional: You can add relevant tags to your GIFs, separated by commas, and add a Source URL to give credit to the original source. You can also change your GIFs from Public to Private. Private GIFs cannot be seen by anyone but you when you are logged in and can't be shared. Settings will be applied to all the GIFs in your upload.
Optional: You can add relevant tags to your GIFs, separated by commas, and add a Source URL to give credit to the original source. You can also change your GIFs from Public to Private. Private GIFs cannot be seen by anyone but you when you are logged in and can't be shared. Settings will be applied to all the GIFs in your upload.
Step 4 - Upload
Hit the Upload GIFs button to finish. Once upload is complete you can view and edit each GIF on its individual page and see all on your channel page if you're logged in.
Hit the Upload GIFs button to finish. Once upload is complete you can view and edit each GIF on its individual page and see all on your channel page if you're logged in.
Step 5 - Share!
You can share GIPHY GIFs on Facebook, Twitter, Instagram, Pinterest, Tumblr, Reddit, text message, email, and everywhere!
You can share GIPHY GIFs on Facebook, Twitter, Instagram, Pinterest, Tumblr, Reddit, text message, email, and everywhere!
PRO TIP: You can also add video files under 15 seconds to Upload to convert them to GIFs.
SLIDESHOW
Use Slideshow to combine your pictures and GIFs into an animated GIF slideshow, a GIF presentation, or a funny GIF mashup
Step 1 – Add Files
Choose still image or GIF files to add by dragging and dropping, clicking the blue search button to browse your files, or entering image URLs to add files to your slideshow. You can combine both stills and GIFs. TIP: If you add image via URL make sure your URL is an image URL ending in .gif, .jpg, .png, etc. and not just any website URL (example GIF URL: http://i.giphy.com/l0O9xQNSsQKmfSeUU.gif)
Choose still image or GIF files to add by dragging and dropping, clicking the blue search button to browse your files, or entering image URLs to add files to your slideshow. You can combine both stills and GIFs. TIP: If you add image via URL make sure your URL is an image URL ending in .gif, .jpg, .png, etc. and not just any website URL (example GIF URL: http://i.giphy.com/l0O9xQNSsQKmfSeUU.gif)
Step 2 – Reorder Images
You can change the order of your images to change the way they will appear in your slideshow.
You can change the order of your images to change the way they will appear in your slideshow.
Step 3 – Set Duration of Still Images
Use the slider to change the length of time still images will appear in your slideshow before going to the next image. This duration only applies to stills as GIFs will always play all the way through once before changing.
Use the slider to change the length of time still images will appear in your slideshow before going to the next image. This duration only applies to stills as GIFs will always play all the way through once before changing.
Step 4 – Add Tags, Source URL, and Privacy settings
Optional: You can add relevant tags to your GIFs, separated by commas, and add a Source URL to give credit to the original source. You can also change your GIF from Public to Private. Private GIFs cannot be seen by anyone but you when you are logged in and can't be shared.
Optional: You can add relevant tags to your GIFs, separated by commas, and add a Source URL to give credit to the original source. You can also change your GIF from Public to Private. Private GIFs cannot be seen by anyone but you when you are logged in and can't be shared.
Step 5 - Create GIF Slideshow
Hit the Create Slideshow button to finish. You will be redirected to the GIF page when it is complete.
Hit the Create Slideshow button to finish. You will be redirected to the GIF page when it is complete.
Step 6 - Share!
You can share your GIF slideshow on Facebook, Twitter, Instagram, Pinterest, Tumblr, Reddit, text message, email, and everywhere!
You can share your GIF slideshow on Facebook, Twitter, Instagram, Pinterest, Tumblr, Reddit, text message, email, and everywhere!
GIF MAKER
Use GIF Maker to create, edit, and add captions to animated GIFs from video files and YouTube links
Use GIF Maker to create, edit, and add captions to animated GIFs from video files and YouTube links
Step 1 – Add Video File or YouTube Link
Choose video by entering YouTube or video URL, dragging and dropping a video file, or clicking the blue search button to browse your files. Videos must be under 100MB and under 15 minutes long.
Choose video by entering YouTube or video URL, dragging and dropping a video file, or clicking the blue search button to browse your files. Videos must be under 100MB and under 15 minutes long.
Step 2 – Edit Start Time and Duration
Use the sliders to select Start Time on the video and the Duration of your GIF.
Use the sliders to select Start Time on the video and the Duration of your GIF.
Step 3 – Add Caption
Optional: Enter your caption in the Caption field and click + button. You can then reposition your caption, edit the text, or remove the caption.
Optional: Enter your caption in the Caption field and click + button. You can then reposition your caption, edit the text, or remove the caption.
Step 4 – Add Tags, Source URL, and Privacy settings
Optional: You can add relevant tags to your GIFs, separated by commas, and add a Source URL to give credit to the original source. You can also change your GIF from Public to Private. Private GIFs cannot be seen by anyone but you when you are logged in and can't be shared.
Optional: You can add relevant tags to your GIFs, separated by commas, and add a Source URL to give credit to the original source. You can also change your GIF from Public to Private. Private GIFs cannot be seen by anyone but you when you are logged in and can't be shared.
Step 5 - Create GIF
Hit the Create GIF button to finish. You will be redirected to the GIF page when it is complete.
Hit the Create GIF button to finish. You will be redirected to the GIF page when it is complete.
Step 6 - Share!
You can share your GIF on Facebook, Twitter, Instagram, Pinterest, Tumblr, Reddit, text message, email, and everywhere!
You can share your GIF on Facebook, Twitter, Instagram, Pinterest, Tumblr, Reddit, text message, email, and everywhere!
Thanks to giphy,com
HOW TO MAKE YOUR LAPTOP HOTSPOT WITHOUT USING SOFTWARE?

If you want to share information stored on your computer with other people nearby and everyone’s computer has a wireless network adapter, a simple method of sharing is to set up an ad hoc wireless network. In spite of the fact that members must be within 30 feet of each other, this type of network presents a lot of possibilities. For example, you might consider establishing an ad hoc network at a meeting of mobile computer users so that you can share information with other attendees on their own screens rather than an overhead projector. (After establishing the network, you can do this by using Windows Meeting, for instance.)
Ad hoc networks are by definition temporary; they cease to exist when members disconnect from them, or when the computer from which the network was established moves beyond the 30-foot effective range of the others. You can share an Internet connection through an ad hoc network, but keep in mind that the Internet connection is then available to anyone logging on to a computer that is connected to the network, and thus is likely not very secure.
To set up an ad hoc network:
- On the Start menu, click Connect To.
- In the Connect to a network window, click the Set up a connection or network task.
- On the Choose a connection option page, click Set up a wireless ad hoc (computer-to-computer) network, and then click Next. (This option only appears on computers that have wireless adapters.)

- Read the ad hoc network information, and then click Next.

- Provide a network name, select whether the network is open or requires authentication, provide a security phrase if necessary, and then click Next.

- after this process your hoc network ready to use

- After Windows Vista sets up the ad hoc network, you have the option of sharing your Internet connection.To disconnect from an ad hoc network, display the Connect To A Network window, click the ad hoc network, and then click Disconnect.


Subscribe to:
Comments (Atom)